I saw another faceter experimenting with frosting the edges between facets and the result was so intriguing I decided to copy the idea. It created such a cool snowflake effect in this aquamarine!
I finally have a gem that is showcased better as a still photo than a video. 🤯
5.94 cts, 10.78mm
Design (unfrosted) is Sparkle Six by Wayne Emery (can be found on the USFG website)


Hello, I found this via browsing “All.”
Could you please explain how you went about making that design? Did you just grind each side till it looked like what you pictured?
I have no jewelry making experience so apologies if this is a silly question.
It’s not a silly question at all 😄 faceting is one of those rare hobbies to stumble across in the real world.
For perspective, this stone took me about 8 hours to cut, so this little comment probably makes the execution sound simpler than it is. Most faceters use a diagram to cut which tells them the precise angle as well as location on the the stone to cut that angle.
We glue our uncut stone to a stick, called a “dop”, to attach it to our angle machine.
We have spinning discs, called “laps” that are basically like sandpaper but made with diamonds instead of sand. When we cut the stone we start at very low grit laps which will cut fast but leave behind deep, rough scratches, then we progress to finer and finer grit laps until the diamond scratches are so microscopic that to a 10x magnification the stone still looks flawlessly polished.
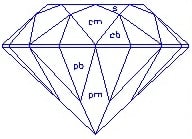
We do this grinding technique to one half of the stone at a time, typically the pavilion (the backside of the gem) first and then the crown (top half) second.
Crylos has actually posted a much more in depth how-to earlier in this community if you want to drive deeper into the rabbit hole of faceting.
In this stone, the frosted facets are actually un-polished areas of the stone, so the snowflake you see is actually very fine scratches that aren’t bouncing light correctly, creating the “line” appearance. There’s multiple facets on the crown, so it is bouncing the “line” appearance through different angles, making it look way more complex than it actually is.
Here’s a photo of the frosting lines on the pavilion. Deceptively simple compared to what you see on the final product, isn’t it? 🤭
Like I don’t have enough hobbies … although I do have a few raw gems …
Jjjjooooiiiinnnn uuuussss 🧟♀️
If a newbie like me was to start from 0, how much startup cost would it take to have a workable setup?
You’re question has seriously amazing timing. Two weeks ago I would have answered you with “several thousand dollars” because the machines that were on the market are all very expensive.
However, last week a passionate faceter came up with an economic solution for those who don’t have thousands to throw at a fancy machine. By modifying an unusable machine from Amazon, you can make it a viable option for faceting and it costs about $500. It will be without bells and whistles but it’s perfectly usable.
https://store.turtleshoard.com/pages/cutkit-one-get-started-faceting-for-under-500
The only other thing you would need to budget for is your rough, and that’s only expensive if you want it to be. If you have local metaphysical shops near you, they often sell quartz pebbles for like $5 and I faceted several of those as my first stones. 😉
Of course, if you want to try before you buy you could look for a local lapidary club or gem and mineral society in your city - send them an email and ask if they know anyone who teaches faceting. I did this and I was very happy to have the experience!
Thank you!!